INFO
This article was auto-translated using ChatGPT.
Some time ago, Raycast released their latest version v1.63.0. One of the biggest updates in this version is that you can now directly access and view the camera inside Raycast. Before the camera opens, there is a shutter animation. When I saw this animation, my curiosity was immediately piqued. Fortunately, Thomas Paul Mann posted a tweet explaining roughly how it works, so I decided to try implementing it myself.
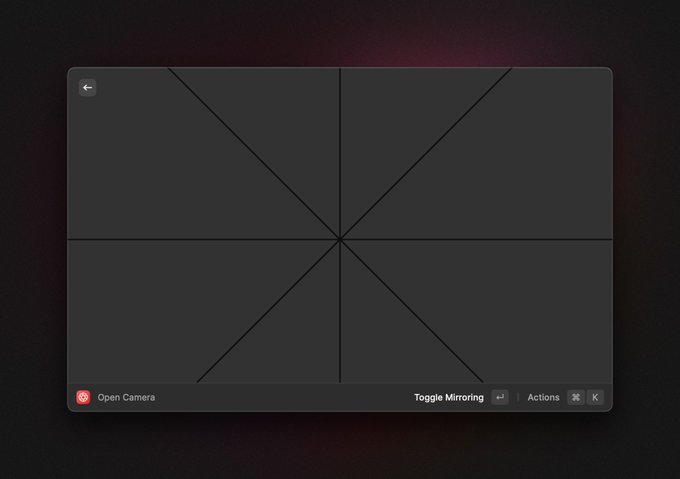
From the screenshot of Raycast's animation above, you can see that it consists of eight right triangles. So all we need to do is implement a single right triangle and then rotate it in increments of 45 degrees to achieve the layout shown.
Here’s the implementation of the right-triangle component:
<template>
  <svg
    :style="{
      height: `${traingleSide}px`,
      width: `${traingleSide}px`,
      // Center the element
      top: -traingleSide + videoHeight / 2,
      left: -appendWidth,
      rotate: `${45 * idx}deg`,
      transformOrigin: 'bottom right',
    }"
  >
    <polygon
      fill="#323232"
      stroke="black"
      stroke-width="2"
      :points="[
        [0, 0],
        [0, traingleSide],
        [traingleSide, traingleSide],
      ]"
    />
  </svg>
</template>

<script setup>
import { computed } from "vue";

const props = defineProps({
  // The size of the video display
  videoWidth: Number,
  videoHeight: Number,
  // Extra width added to the triangle side
  // Ensures the video remains fully covered during the animation
  appendWidth: Number,
  // The index of this triangle, used to calculate rotation
  idx: Number,
});

const traingleSide = computed(() =>
  Math.ceil(props.videoWidth / 2 + props.appendWidth),
);
</script>
With the right-triangle component ready, we can now write the main page:
<template>
  <div class="h-screen w-screen flex justify-center items-center">
    <div
      ref="videoBox"
      class="w-2/3 border-gray-200 rounded-md border-3 border-solid
            shadow-black aspect-video box-content relative overflow-hidden"
    >
      <div
        class="relative"
        :style="{
          width: `${videoWidth}px`,
          height: `${videoHeight}px`,
        }"
      >
        <video
          ref="video"
          class="rounded-md w-full h-full"
          style="filter: brightness(0.1)"
        />
      </div>
      <Traingle
        ref="tList"
        class="absolute"
        v-for="(_item, index) in Array(8)"
        :idx="index"
        :videoHeight="videoHeight"
        :videoWidth="videoWidth"
        :appendWidth="150"
      />
    </div>
  </div>
</template>

<script setup>
import { onMounted, ref } from "vue";
import { useAnimate, useElementSize } from "@vueuse/core";
import Traingle from "./components/traingle.vue";

const FIX_VIDEO_BLACK_WIDTH = 6;

const video = ref(null);
const videoBox = ref(null);
const { width: videoWidth, height: videoHeight } = useElementSize(videoBox);

const tList = ref([]);

const openCameraAnimate = () => {
  const options = {
    fill: "forwards",
    duration: 800,
    easing: "ease-in-out",
  };

  // Make the triangles expand outward in a circular-opening motion
  tList.value.map((item) =>
    useAnimate(
      item,
      {
        transform: `translate(
          ${Math.tan(Math.PI / 8) * videoWidth.value}px,
          -${videoWidth.value}px)`,
      },
      options,
    ),
  );
  useAnimate(video, { filter: "brightness(1)" }, options);
};

onMounted(() => {
  // Access camera
  navigator.mediaDevices
    .getUserMedia({
      video: {
        height: videoHeight.value,
        width: videoWidth.value + FIX_VIDEO_BLACK_WIDTH,
      },
    })
    .then((stream) => {
      video.value.srcObject = stream;
    })
    .catch((error) => {
      console.error("Failed to access camera:", error);
    });

  // After video metadata loads, start playback and animation
  video.value.onloadedmetadata = () => {
    video.value.play();
    openCameraAnimate();
  };
});
</script>
And with that, you can recreate the camera shutter animation!
Check out the source code, and try the Demo.