前段时间 Raycast 发布了最新版本 v1.63.0,这个版本的一个最重要的更新就是可以直接在 Raycast 调用摄像头并查看。 在 Raycast 打开摄像头之前会有一个快门动画,当我看到这个动画的时候就立马勾起了我的好奇心,刚好 Thomas Paul Mann 有发推文介绍大致如何实现,于是我决定按图索骥实现一下。
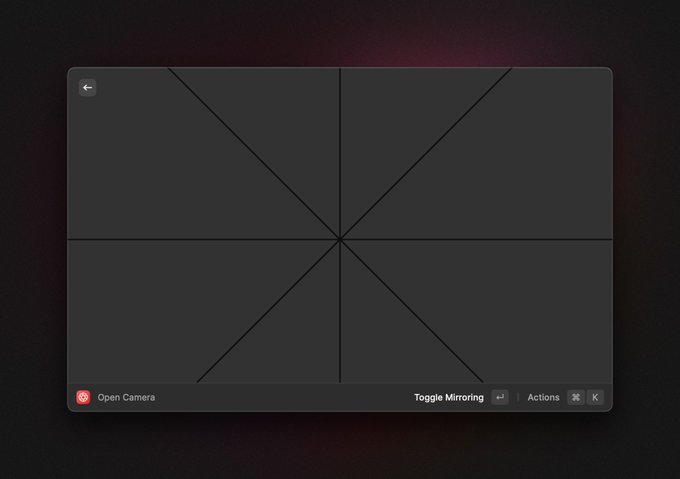
从上面的 Raycast 动画截图可以看出是由八个直角三角行构成的,那么现在我们只需要实现一个直角三角形之后再依次旋转 45 度,这样就可以实现上图中的布局了。 那么 直角三角形 组件的实现如下:
vue
<template>
  <svg
    :style="{
      height: `${traingleSide}px`,
      width: `${traingleSide}px`,
      // 使得元素居中
      top: -traingleSide + videoHeight / 2,
      left: -appendWidth,
      rotate: `${45 * idx}deg`,
      transformOrigin: 'bottom right',
    }"
  >
    <polygon
      fill="#323232"
      stroke="black"
      stroke-width="2"
      :points="[
        [0, 0],
        [0, traingleSide],
        [traingleSide, traingleSide],
      ]"
    />
  </svg>
</template>

<script setup>
import { computed } from "vue";

const props = defineProps({
  // 传入视频显示大小
  videoWidth: Number,
  videoHeight: Number,
  // 传入需要直角三角边多加的大小
  // 以便可以在动画的时候能够依旧覆盖得住 video
  appendWidth: Number,
  // 当前组件为第几个 以计算旋转角度
  idx: Number,
});

const traingleSide = computed(() =>
  Math.ceil(props.videoWidth / 2 + props.appendWidth),
);
</script>
上面就是 直角三角形 组件了,之后就可以写主页面了:
vue
<template>
  <div class="h-screen w-screen flex justify-center items-center">
    <div
      ref="videoBox"
      class="w-2/3 border-gray-200 rounded-md border-3 border-solid
            shadow-black aspect-video box-content relative overflow-hidden"
    >
      <div
        class="relative"
        :style="{
          width: `${videoWidth}px`,
          height: `${videoHeight}px`,
        }"
      >
        <video
          ref="video"
          class="rounded-md w-full h-full"
          style="filter: brightness(0.1)"
        />
      </div>
      <Traingle
        ref="tList"
        class="absolute"
        v-for="(_item, index) in Array(8)"
        :idx="index"
        :videoHeight="videoHeight"
        :videoWidth="videoWidth"
        :appendWidth="150"
      />
    </div>
  </div>
</template>

<script setup>
import { onMounted, ref } from "vue";
import { useAnimate, useElementSize } from "@vueuse/core";
import Traingle from "./components/traingle.vue";

const FIX_VIDEO_BLACK_WIDTH = 6;

const video = ref(null);
const videoBox = ref(null);
const { width: videoWidth, height: videoHeight } = useElementSize(videoBox);

const tList = ref([]);

const openCameraAnimate = () => {
  const options = {
    fill: "forwards",
    duration: 800,
    easing: "ease-in-out",
  };

  // 使得三角可以以一个接近圆形的开口不断扩大并退出
  tList.value.map((item) =>
    useAnimate(
      item,
      {
        transform: `translate(
          ${Math.tan(Math.PI / 8) * videoWidth.value}px,
          -${videoWidth.value}px)`,
      },
      options,
    ),
  );
  useAnimate(video, { filter: "brightness(1)" }, options);
};

onMounted(() => {
  // 调用摄像头
  navigator.mediaDevices
    .getUserMedia({
      video: {
        height: videoHeight.value,
        width: videoWidth.value + FIX_VIDEO_BLACK_WIDTH,
      },
    })
    .then((stream) => {
      video.value.srcObject = stream;
    })
    .catch((error) => {
      console.error("访问摄像头失败:", error);
    });
  // 摄像头内容加载好后显示并播放动画
  video.value.onloadedmetadata = () => {
    video.value.play();
    openCameraAnimate();
  };
});
</script>
这样就可以实现相机快门动画了!